
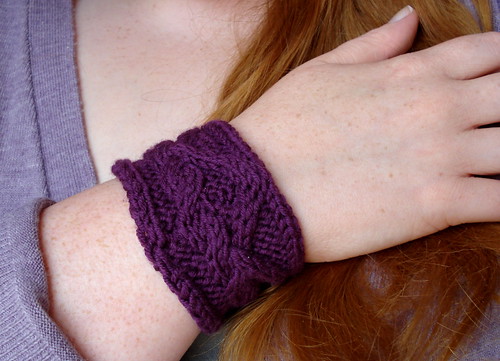
Twisty wristband

This wristband is a small, quick project designed to teach you a few techniques to spice up your knitting. The provisional caston and three-needle bindoff are fantastic tools for knitting seamlessly. Throw in a few cool cables, and you've got a fun afternoon project.
This pattern is written with the instructions of each section first, and the explanation immediately afterward. If you don't understand the instructions, then keep reading, but if you already know the technique, you can move on to the next section.
Yarn: About 20yds of DK-weight yarn (shown: Debbie Bliss Rialto)
Needles: US6 (4mm) needles
Supplies: Waste yarn, crochet hook (optional), yarn needle, third needle for three-needle BO
Abbreviations
k - knit
p - purl
c4l - cable 4 left (front) - Slip 2 sts to the cable needle and hold to front, k2, k2 from cable needle.
c4r - cable 4 right (back) - Slip 2 sts to the cable needle and hold to back, k2, k2 from cable needle.
c4lp - cable 4 left, purl background - Slip 2 sts to the cable needle and hold to front, p2, k2 from cable needle.
c4rp - cable 4 right, purl background - Slip 2 sts to the cable needle and hold to back, k2, p2 from cable needle.
Note: Cable stitches have many names. The stitches that I call c4l and c4r, you may also see as c4f and c4b. I prefer to name the stitches after the way the finished stitches look, not the way they are performed. A c4l/c4f is a left-leaning cable. Any time you knit a cable pattern, the cables stitches should be defined for you in the abbreviations section.
Provisional caston.
Provisionally cast on 18 sts.
Provisional castons can be worked in a variety of ways. Here are a few videos for provisional caston techniques. Use the one that you like best.
Italian Provisional Cast On - Crochet Provisional Cast On - Techknitter 'COWYAK' Cast On
Cable pattern.
Work cable pattern 4 times, or until the band is long enough to comfortably go around your wrist (it will need to stretch to get over your hand).
The cable pattern is charted and written. If you've never used a cable chart before, give it a try! You can always refer to the written instructions if you get confused.
Chart & Key:


Written instructions:
Row 1 (WS): P2, k1, p2, k4, p4, k3, p2.
Row 2 (RS): K2, p3, k4, p2, c4rp, p1, k2.
Row 3: P2, k3, p2, k2, p4, k3, p2.
Row 4: K2, p3, c4r, c4rp, p3, k2.
Row 5: P2, k5, p6, k3, p2.
Row 6: K2, p3, k2, c4l, p5, k2.
Row 7: Rep Row 5.
Row 8: K2, p3, c4r, c4lp, p3, k2.
Row 9: Rep Row 3.
Row 10: K2, p3, k4, p2, c4lp, p1, k2.
Row 11: Rep Row 1.
Row 12: K2, p3, c4r, p4, k2, p1, k2.
Row 13: Rep Row 1.
Three-needle bindoff in pattern.
Pick up the stitches from your provisional caston and remove the waste yarn. If you have 18 sts, continue with the bindoff. If you have 17 sts, cast on one additional stitch using the tail of your yarn, and continue.
With the wrong side facing outward, work a three-needle bind off in pattern, using row 1 of the cable pattern.
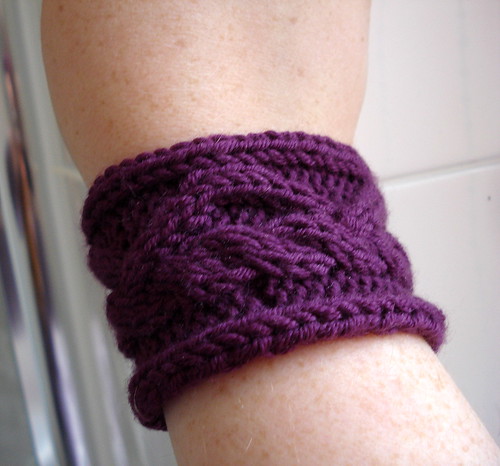
The three-needle bindoff
The three-needle bindoff is a great technique for attaching two fabric edges together, such as sweater shoulders, the bottoms of bags, etc. It is easier to work than grafting, but creates a small ridge where the fabric was joined.
Can you see the ridge?
You have three needles: one to hold each set of stitches, and a working needle. With the wrong side of work facing outward, place the two holding needles next to each other. Slide the working needle into the first two stitches, to knit them together. Since we are binding off in pattern here, we will slide the needle from back to front and right to left through both stitches, to p2tog. One st on the working needle. Work the p2tog again, on the next set of two sts. Then, pull the rightmost st on the working needle over the second st, as in a conventional bindoff. One st bound off, one st on working needle. Continue in this manner, working in pattern (the next set of two sts will be knit together, the next two will be purled together, the next four will be knit together, etc) until all sts are bound off.
If you need more help, see this video -- just remember to bind off in pattern, not all in knit.
Finishing.
Break yarn. Turn the cable band right-side-out. Weave in all ends and block if desired. Done!
If you enjoyed this free pattern, please check out my other patterns as well! :)
~Joyuna
 The Grateful Crane Shawl
 Elven Slippers
 Russell Square Mitts
 Russell Square Tam
 iTouch Jumper
 Twisty Wristband
 Mawata Pulsewarmers
Hi, I've been thinking about the cables, this looks like a nice one to learn on. Thank you for the instructions:)
ReplyDeleteI am new with cable needles. But I want to try it. Do you have an easier pattetn for cable needles?
ReplyDelete